How to convert apple heic image format to jpeg
Not all applications are ready to accept Apple's new HEIC image format. Acceptable formats for the CAS web site are currently JPEG, JPG, and PNG. These instructions explain how to convert a photograph you took with your Apple iPhone or iPad from HEIC to JPEG.
1. Open Photos on your MAC
2. Select the photo you want to convert
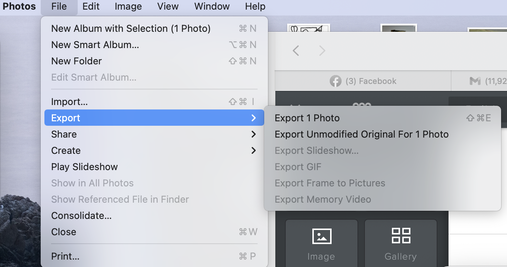
3. Click on FILE in the upper right hand corner.
4. Click EXPORT
5. Click EXPORT 1 PHOTO
2. Select the photo you want to convert
3. Click on FILE in the upper right hand corner.
4. Click EXPORT
5. Click EXPORT 1 PHOTO
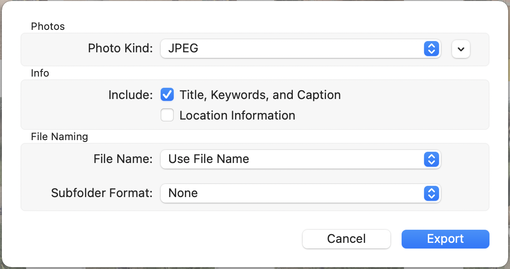
6. Choose USE FILE NAME from File Name drop down (Photo Kind should default to JPEG)
7. Click on EXPORT
8. Select the location where you want to export the image (Your Desktop is probably the most convenient)
8. Select the location where you want to export the image (Your Desktop is probably the most convenient)
9. You're done! You can now upload that newly formatted file to the call for art.
10. But wait! If you haven't renamed your image yet, before you upload it is the time to rename it.
From Finder, right click on the image and select RENAME. Change the name to YourLastName_NameOfWork.jpeg. For example I would name my art piece mckenzie_sunsetovertheminch.jpeg
10. But wait! If you haven't renamed your image yet, before you upload it is the time to rename it.
From Finder, right click on the image and select RENAME. Change the name to YourLastName_NameOfWork.jpeg. For example I would name my art piece mckenzie_sunsetovertheminch.jpeg


